This article describes how to authorize a .NET application to connect to an Azure SQL Server through Azure Active Directory.
Why
You don't want to connect to a database with your personal account details. You want to be able to control the login over time, expiring access as needed.
Register your application
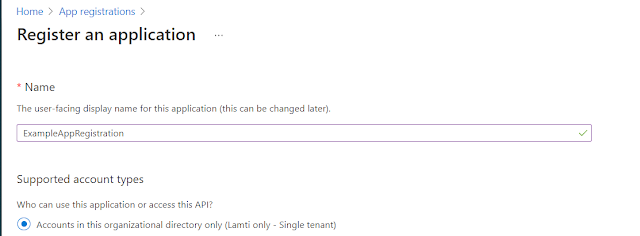
Presuming you have an Azure SQL Server and a Database you'd like to connect to, you'll need to register your application in Azure AD. This is done through the App Registrations blade:
You won't need to register a Redirect URL for this example.
At this point, it will be prudent to write down the following properties for later use:
- Application (client) ID (called AppId in the accompanying code)
- Directory (tenant) ID (called TenantId in the accompanying code)
Grant access to Azure SQL Database
Next up, we need to give your application access to the Azure SQL Database service. This is done through the API Permissions blade:
Add client authentication
In order for your application to be able to authenticate as this Active Directory representation of it, switch over to Certificates & secrets and create a New client secret:
Write down the secret
Value for later use (called
AppSecret in the accompanying code).
Configure the Azure SQL
Switch over to your Azure SQL Server instance and select the Active Directory admin blade, ensuring you select an appropriate account (our managed application in this example):
Then, head over to
Firewalls and virtual networks, ensuring you accept connections from the machine where your .NET application is running:
Write down
- your instance name (testingmsaccess in this example; called DatabaseServer in the accompanying code)
- your database name (called DatabaseInstance in the accompanying code)
- and the resource group the server lives in (available from the Overview pane; called ResourceGroupName in the accompanying code)
Getting access to the database
At this point, your .NET application is able to connect to the database server, but cannot yet access any database. To go the last mile, we unfortunately have to run some PowerShell ...
Pre-requisites
Run Windows PowerShell 5.1 as Administrator
Access continued
OK, you can close the admin version now and start a standard user copy.
# Connect to Azure Resource Manager (notice the new login window with ALT+TAB)
Connect-AzureRmAccount -Tenant $TenantId
# Optional: Select the appropriate subscription
Select-AzureRmSubscription -Subscription "Visual Studio Enterprise"
# Assign an identity to the Azure SQL logical server
Set-AzureRmSqlServer `
-ResourceGroupName $ResourceGroupName `
-ServerName $DatabaseServer `
-AssignIdentity
# Assign Directory Readers permission to the SQL logical server identity
Load-Module AzureAD
# Connect to Azure Active Directory (notice the new login window with ALT+TAB)
Connect-AzureAD -TenantId $TenantId
## Get Azure AD role "Directory Users" and create if it doesn't exist
$RoleName = "Directory Readers"
$role = Get-AzureADDirectoryRole | Where-Object {$_.displayName -eq $roleName}
if ($null -eq $role) {
# Instantiate an instance of the role template
$roleTemplate = Get-AzureADDirectoryRoleTemplate |
Where-Object {$_.displayName -eq $roleName}
Enable-AzureADDirectoryRole `
-RoleTemplateId $roleTemplate.ObjectId
$role = Get-AzureADDirectoryRole |
Where-Object {$_.displayName -eq $roleName}
}
## Get service principal for managed instance
$roleMember = Get-AzureADServicePrincipal -SearchString $DatabaseServer
$roleMember.Count
if ($null -eq $roleMember) {
Write-Output "Error: No Service Principals with name '$($DatabaseServer)', `
make sure that AssignIdentityName parameter was entered correctly."
exit
}
if (-not ($roleMember.Count -eq 1)) {
Write-Output "Error: More than one service principal with name pattern `
'$($DatabaseServer)'"
Write-Output "Dumping selected service principals...."
$roleMember
exit
}
## Check if service principal is already member of readers role
$allDirectoryReaders = Get-AzureADDirectoryRoleMember -ObjectId $role.ObjectId
$selectedDirectoryReader = $allDirectoryReaders |
Where-Object { $_.ObjectId -match $roleMember.ObjectId}
if ($null -eq $selectedDirectoryReader) {
Write-Output "Adding service principal '$($DatabaseServer)' to `
'Directory Readers' role'..."
Add-AzureADDirectoryRoleMember `
-ObjectId $role.ObjectId `
-RefObjectId $roleMember.ObjectId
Write-Output "'$($DatabaseServer)' service principal added to `
'Directory Readers' role'..."
} else {
Write-Output "Service principal '$($DatabaseServer)' is already`
a member of 'Directory Readers' role'."
}
# Get Access Token
Import-Module MSAL.PS
$result = Get-MsalToken `
-ClientId $AppId `
-ClientSecret (ConvertTo-SecureString $AppSecret -AsPlainText -Force) `
-TenantId $TenantId `
-Scopes "https://database.windows.net/.default"
$AccessToken = $result.AccessToken
Notice the Scopes above. This represents what we are trying to access - Microsoft Azure's database service. We'll refer back to this in our .NET application.
We are now ready to connect to our database and create a user association with our Active Directory Service Principal:
$conn = New-Object System.Data.SqlClient.SQLConnection
$conn.ConnectionString = "Data Source=$DatabaseServer.database.windows.net;`
Initial Catalog=$DatabaseName;Connect Timeout=30"
$conn.AccessToken = $AccessToken
$conn.Open()
$statement = "CREATE USER [$AppRegistrationName] FROM EXTERNAL PROVIDER;"
$command = New-Object -TypeName System.Data.SqlClient.SqlCommand($statement, $conn)
$command.ExecuteNonQuery()
$statement = "ALTER ROLE db_owner add member [$AppRegistrationName];"
$command = New-Object -TypeName System.Data.SqlClient.SqlCommand($statement, $conn)
$command.ExecuteNonQuery()
$conn.Close()
Done! No more PowerShell!
Connecting from our .NET application
With all of the above set up in place (surely there must be an easier way ... ?), we are now ready to make a connection from our .NET application.
You'll need to reference the NuGet package Microsoft.Identity.Client (I used 4.3.10).
We start off with a brief connection string:
readonly string _connectionString = $@"Server={DatabaseServer}; Database={DatabaseInstance}";
Then, we set up our Azure Active Directory application representation:
IConfidentialClientApplication app = ConfidentialClientApplicationBuilder
.Create(AppId)
.WithClientSecret(AppSecret)
.WithAuthority($"https://login.microsoftonline.com/{TenantId}")
.Build();
Time to get our access token:
var token = await app
.AcquireTokenForClient(new List<string>
{
"https://database.windows.net/.default"
})
.ExecuteAsync();
... before we can finally connect to our database:
await using var conn = new SqlConnection(_connectionString);
conn.AccessToken = token.AccessToken;
conn.Open();
And that's all (‼) that is required to connect to Azure SQL using an Active Directory Service Principal!


Comments